I have signed up for the 2020 Ride for Roswell, which will (hopefully) take place on June 27, 2020. The ride is to raise money for Roswell Park Cancer Center in Buffalo, New York and last year attracted over 8,000 riders.
This is the Ride’s 25th anniversary and I am excited to be signed up for the 100 mile route again. To raise money, I will be offering any of my scripts for a donation to the ride. Here is a link to my fund raising page. After you donate, please email me and let me know which script you want.
In addition to the scripts in my store, I will be offering some others as well. Check back often to see if there any that will be useful to you. I will put links to them here:
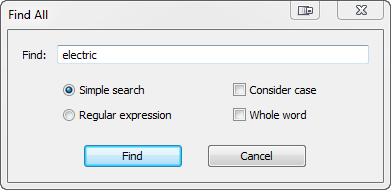
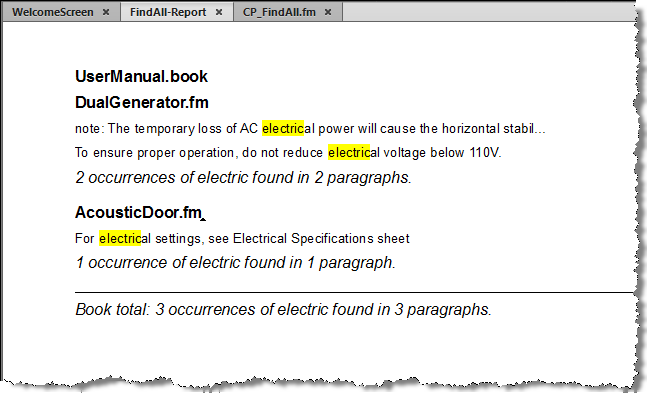
Those of us who use text editors know the benefit of being able to search an entire file (or set of files) and see all of the results in a single list. This will soon be possible with FrameMaker with my new FindAll script. Here is the dialog box for the initial prerelease version:
The script generates a hyperlinked report of all of the strings or regular expression matches. The report is fully customizable.
At this point, the code is about 75% finished. I need a FrameMaker book that I can test and demonstrate with, as well as some willing testers. Please contact me at rick at frameexpert dot com if you can help.
As always, I am open for comments and suggestions. Thank you very much.
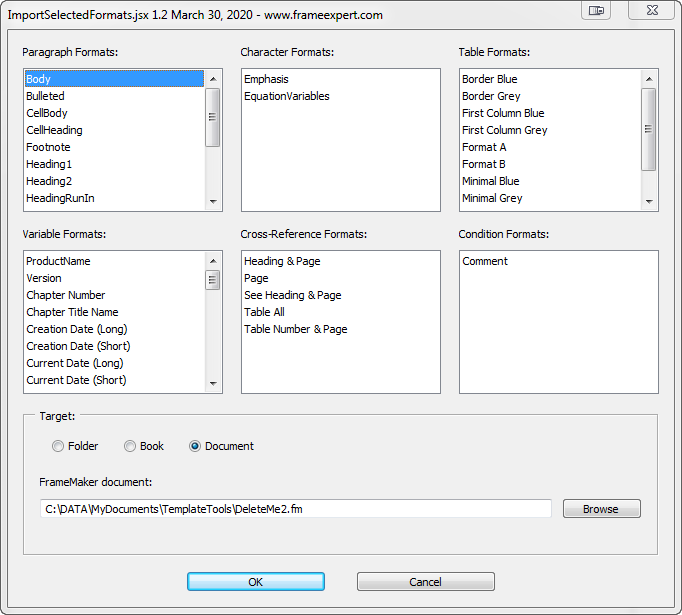
This question comes up once in awhile: “How do I just import certain paragraph or character formats from a FrameMaker document into other documents?” Here is the way I normally do it manually:
Make a copy of the document I am using as a template.
Modify one or more paragraph or character formats that I want to import into other documents.
Delete all of the other paragraph and character formats from the document. Now I am just left with the formats that I want to import into the other documents.
Open my target document or book and choose File > Import > Formats and choose the document I made in step 1.
Of course, it is better to have an automated solution. ImportSelectedFormats allows you to open any FrameMaker document and select which Paragraph, Character, Table, Variable, Cross-Reference, and Condition formats you want to import into your target documents. You have a choice of targets: A folder (and optional subfolders) of FrameMaker documents, a FrameMaker book, or a FrameMaker document. None of the target documents have be open when you run the script.
A big improvement with the latest version is the ability to selectively import System Variable formats as well as User Variable formats.
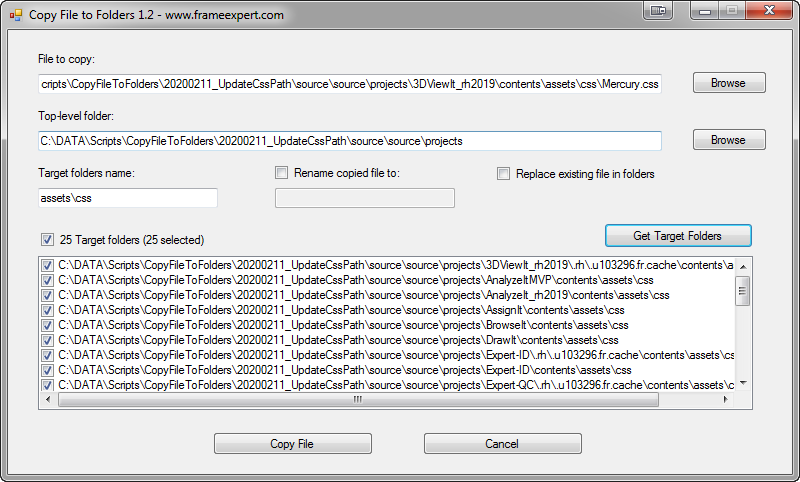
This is an interesting program that I wrote to address a specific client problem: They had a single file that they wanted to duplicate and copy to a bunch of different target folders on their computer. Here is a screenshot of the latest version.
Please note that this is an executable that runs in Windows and is not specific to any application, including FrameMaker. Here is how it works:
1. Enter the File to copy
This is the file that you want to copy to all of the target folders. In this example, they are selected a newly updated Mercury.css file that they want to copy to a bunch of project folders.
2. Enter the Top-level folder
This is the highest-level folder that contains all of the target folders somewhere below it. In this example, the “projects” folder has been selected.
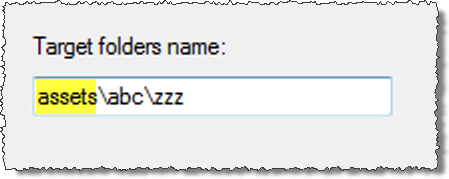
3. Enter the Target folders name
This is the name of the folders where the File to copy will be copied to. You can either enter a single folder name or a hierarchy of folders. If you add a single folder name, the program will search for all folders that match that name below the top-level folder.
To add a hierarchy of folders, separate each folder with a backslash. Note that the first folder in the list is an “anchor folder” and must exist at least once under the Top-level folder. In the example below, “assets” (highlighted in yellow) is the anchor folder. Any folders below the anchor folder will be created by the program, if they don’t exist. The final target folder will be the last one in the hierarchy; in this example it will be the “zzz” folder.
Using a hierarchy for the Target folders name can serve two important purposes:
This feature will limit the target folders to the hierarchy specified in the Target folders name field. In this example, the File to copy will only be copied to “zzz” folders that are directly under “assets\abc” folders. Any other “zzz” folders under the Top-level folder will not be targeted.
Second, the program will automatically create any sub-folders under each anchor folder before copying the file to the target folders. In this example, the “abc” and “zzz” folders will be created under the “assets” folders, if they don’t exist.
4. Use the Rename or Replace options
You can choose to rename the file as it is copied to the target folders. You can also decide if you want to replace any existing files with the same name in the target folders.
5. Click the Get Target Folders button
This will populate the Target folders list so you can preview the targets of the file you are copying. Use the check boxes in the list to deselect any folders that you don’t want to be a target of the copy.
6. Click the Copy File button
The file will be copied to all of the target folders and give you the results in a message box.
You can have a copy of this program for a donation of $25 or more to the 2020 Ride for Roswell charity ride. As always, comments and suggestions are welcome. Thank you for your generosity!
A recent post on the Framers list asked if the Automatic Backup on Save location (Edit > Preferences) could be changed. It can’t with stock FrameMaker, but I have written a simple event script that will do it for you. The backup folder you specify has to be hard-coded into the script, but I may enhance it later by adding a settings file or a dialog box where you can specify the location.
where <UserName> is your Windows login name and <VersionNumber> is the FrameMaker version number (2015 = 13; 2017 = 14; 2019 = 15; etc.). Note that if the startup folder does not exist, you have to create it.
Open the script with a text editor and change the path on line 18 to the desired backup folder on your system. Note that backslashes must be doubled in the path. Do not include backslashes at the end of the path.
Save the script, and quit and restart FrameMaker. Open and edit a document and then save it. Every time you save a FrameMaker document, you will get a copy in the backup folder you specified.
To disable the script, remove it from your startup folder.
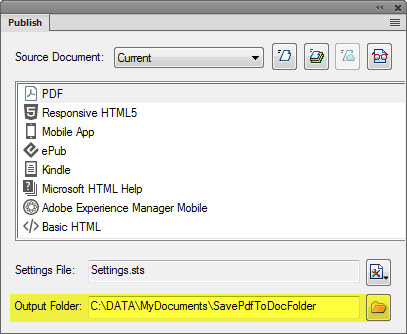
Are you using FrameMaker 2019 and its nice new PDF engine? As you know, the Publish pod is now the preferred way of producing PDF output. But where is your PDF file created? You specify the output path at the bottom of the Publish pod.
But the Output Folder is not related to the location of the active book or document that you are publishing. Once you set the path, the value is “sticky” until you change it. Even if you change it to the folder containing your book or document, an additional “PDF” folder is created during the publish process. This can make it a hassle to find your PDF after it is published.
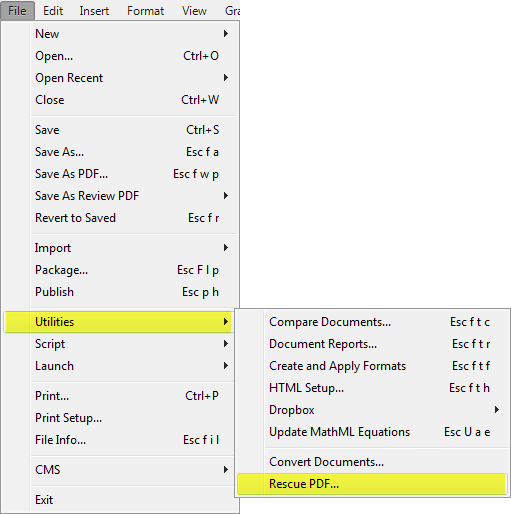
In honor of my 60th birthday–today, October 24–I have written a script called Rescue PDF to solve the problem. And, yes, it is free! After you install it, you choose File > Utilities > Rescue PDF.
A small dialog box will appear. Click Copy PDF to book or document folder. You can also click View PDF after copying so that the PDF is displayed after it is copied.
And that’s all there is to it! Now when you create a PDF using the Publish pod it will be copied to the folder that contains your book or document. When Rescue PDF is active, a checkmark will appear next to the command on the Utilities menu. To disable it, simply choose the command again and uncheck the Copy PDF checkbox.
A couple of caveats
If the PDF you are creating is still open in the book or document folder when you publish again, you will not get a warning; the new PDF will simply not get copied to the folder. So make sure you close the PDF after viewing it.
When you use the Publish command, a dialog box will display telling you that the job is finished. It will show you the original Output Folder path.
Of course, when using Rescue PDF, you don’t need to see this dialog box, but I haven’t figured out a way to suppress it. So just click Done to get rid of it.
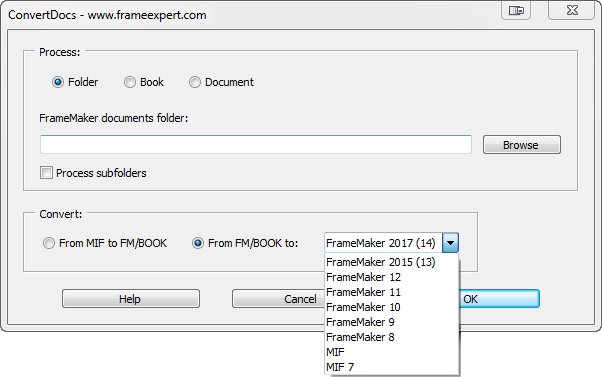
I am excited about a new script I just released: ConvertDocs. It is designed to convert FrameMaker documents and books in batches.
Convert FrameMaker documents and books to earlier versions. This is useful for exchanging documents with those using earlier versions of FrameMaker.
Convert FrameMaker documents and books to MIF or MIF 7. Translation vendors often require MIF files for their translation software. Quickly “mif-wash” problem documents.
Convert from MIF files to FrameMaker documents and books. Convert localized MIF files back to FrameMaker documents and books.
“Upconvert” older FrameMaker files to the current version you are using. After updating FrameMaker, convert your documents and books to the latest version.
Easily localize ConvertDoc’s interface.
Here is a screenshot of the interface:
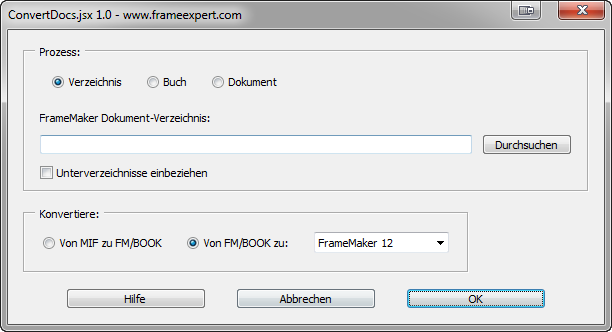
Here is the interface localized to German by Klaus Daube. Thank you Klaus!
A recent question on the FrameMaker list asked about formatting a Table of Contents. Here is a video that gives an overview of the process. Please let me know if you have any comments or questions.
TemplateTools is a powerful script that allows you to quickly format and update Paragraph Formats using FrameMaker’s formatting toolbars. Easily add new Paragraph Formats and format them “by example” in the document. Quickly remove Paragraph Format overrides and unused Paragraph Formats. Click here to see the documentation. The 7 minute video below will show you how it works. TemplateTools makes working with Paragraph Formats fun and easy!
Here is a follow up to the Autonumber Primer that was posted last week. If you are brand new to FrameMaker or autonumbers, you should watch that video first:
The video below goes into more detail about autonumbers and how to set up a complex series of autonumbered paragraph formats. The focus is on the counter building blocks and how they relate to each other in a series of autonumbered paragraphs. Your comments and questions about autonumbers are welcomed in the comments section below.
Towards the end of the video, I demonstrate a simple ExtendScript script for transferring the autonumber building blocks from the table to your paragraph formats. This eliminates the need to tediously copy and paste them one-by-one from the table. You can purchase this script for $19 US from my Carmen Publishing Inc. Store.