Part 1 and Part 2 of this series show the beginning of the typical script development process that I use. I like to isolate scripting tasks to the smallest units possible. For this task, we worked on a single selection of conditionalized text in the active document. When we switched to tables, we selected a single row with conditions applied. This approach allows us to get the basic functionality working without worrying about the overhead that the larger script requires. Once the basic functionality is working, we can expand it to work on an entire document or book.
Let’s start by figuring out how to specify which Condition Formats to remove from the text and table rows in a document. To keep things simple, we can use an array of Condition Format names:
#target framemaker
var doc = app.ActiveDoc;
// Make an array of Condition Format names to remove.
var removeConditions = ["Condition2"];
Even if we add an interface to the script later (like a dialog box), we can still use an array to store the condition names. We need to figure out a way to compare the contents of the array with the conditions that are applied to a given range of text. To set this up, make sure you have a document open with two Condition Formats, Condition1 and Condition2, applied to a paragraph. Select some of the text in the paragraph. We can add our array to some of the code we previously developed:
#target framemaker
var doc = app.ActiveDoc;
// An array of condition formats to remove from the text and rows.
var removeConditions = ["Condition2"];
var textRange = doc.TextSelection;
var prop = doc.GetTextPropVal (textRange.beg, Constants.FP_InCond);
var condFmts = prop.propVal.osval;
// Display the condition format names that are applied to the text.
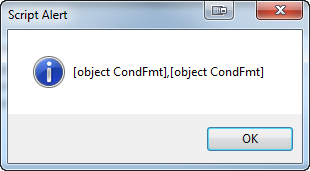
for (var i = 0; i < condFmts.length; i += 1) {
alert (condFmts[i].Name);
}
The script will display each condition format that is applied to the selected text. We need a way to test each name and see if it is in the removeConditions array. Any conditions that are in the removeConditions array need to be removed from the condFmts list. In some implementations, a JavaScript array has an indexOf method so you can test and see if the array contains a particular member. If the member exists, indexOf returns the array index; otherwise, it returns -1. We could do this:
#target framemaker
var doc = app.ActiveDoc;
var removeConditions = ["Condition2"];
var textRange = doc.TextSelection;
var prop = doc.GetTextPropVal (textRange.beg, Constants.FP_InCond);
var condFmts = prop.propVal.osval;
// Loop through the condition format names that are applied to the text.
for (var i = 0; i < condFmts.length; i += 1) {
// See if the format is in the remove list.
if (removeConditions.indexOf (condFmts[i].Name) > -1) {
// Remove it from the list.
Array.prototype.splice.call (condFmts, i, 1);
}
}
// Apply the updated list back to the text range.
prop.propVal.osval = condFmts;
doc.SetTextPropVal (textRange, prop);
The indexOf method is being used in the if statement on line 12. There is one problem with this code: The current Adobe ExtendScript implementation does not have an indexOf method on arrays. We are going to call (line 4 in the following code) a function (lines 27-45) that will augment the built-in Array object and add an indexOf method to it. Object augmentation is beyond the scope of this lesson, but google it if you are interested in how it works. Here is the entire code:
#target framemaker
// Call a function to add functions to built-in objects.
augmentObjects ();
var doc = app.ActiveDoc;
var removeConditions = ["Condition2"];
var textRange = doc.TextSelection;
var prop = doc.GetTextPropVal (textRange.beg, Constants.FP_InCond);
var condFmts = prop.propVal.osval;
// Loop through the condition format names that are applied to the text.
for (var i = 0; i < condFmts.length; i += 1) {
// See if the format is in the remove list.
if (removeConditions.indexOf (condFmts[i].Name) > -1) {
// Remove it from the list.
Array.prototype.splice.call (condFmts, i, 1);
}
}
// Apply the updated list back to the text range.
prop.propVal.osval = condFmts;
doc.SetTextPropVal (textRange, prop);
function augmentObjects () {
// Add an indexOf method to the Array object.
if (!Array.prototype.indexOf) {
Array.prototype.indexOf = function (obj, fromIndex) {
if (fromIndex == null) {
fromIndex = 0;
} else if (fromIndex < 0) {
fromIndex = Math.max(0, this.length + fromIndex);
}
for (var i = fromIndex; i < this.length; i++) {
if (this[i] === obj) {
return i;
}
}
return -1;
};
}
}
OK, we have the basic functionality working, so let's encapsulate it into a function that we easily drop into a bigger script. We want the function to take a text range, a list of conditions to remove, and a document object. Here is one way we can do this:
#target framemaker
// Call a function to add functions to built-in objects.
augmentObjects ();
var doc = app.ActiveDoc;
var removeConditions = ["Condition2"];
var textRange = doc.TextSelection;
// Remove the condition(s) from the selected text.
removeConditionsFromText (textRange, removeConditions, doc);
function removeConditionsFromText (textRange, removeConditions, doc) {
var prop, condFmts, i;
// Get a list of the conditions applied to the beginning of the text range.
prop = doc.GetTextPropVal (textRange.beg, Constants.FP_InCond);
condFmts = prop.propVal.osval;
// Loop through the condition format names that are applied to the text.
for (i = 0; i < condFmts.length; i += 1) {
// See if the format is in the remove list.
if (removeConditions.indexOf (condFmts[i].Name) > -1) {
// Remove it from the list.
Array.prototype.splice.call (condFmts, i, 1);
}
}
// Apply the updated list back to the text range.
prop.propVal.osval = condFmts;
doc.SetTextPropVal (textRange, prop);
}
// augmentObjects function not shown but required!
Some important points:
- The new function is on lines 14-34.
- We followed best practices and declare all variables at the top of the function (line 16).
- Because the function uses the indexOf method, we have to include the augmentObjects function in any script that uses our new function. In addition, we have to remember to call augmentObjects at the top of our script (like we do on line 4).
- IMPORTANT: The script gets the condition format properties at the beginning of the text range. It removes the appropriate conditions from that list and then applies those properties to the entire text range. For this reason, we want to pass in text ranges that only have distinct condition formats applied to them. If you are not sure why, post a comment below.
Before moving on, there is one issue we should address. One line 32, we apply the updated list of conditions back to the propVal object; then line 33 applies the property list to the text range. But what if this list was empty to start with, or hasn't been changed by the loop on lines 23-29? There is no sense in going further, so let's add a couple of tests to the function. We can add this below line 20:
if (condFmts.length === 0) {
return; // No conditions are applied to the text range; exit the function.
}
If there are no conditions applied to the text, then there are none that can be removed; so we simply exit the function. If there are conditions applied, they may be conditions that aren't in our removeConditions array. So we can test to make sure that conditions were actually removed before updating the text (this code would replace lines 31-33):
if (condFmts.length !== prop.propVal.osval.length) {
// Conditions were removed; apply the updated list back to the text range.
prop.propVal.osval = condFmts;
doc.SetTextPropVal (textRange, prop);
}
Here is the finished function:
function removeConditionsFromText (textRange, removeConditions, doc) {

    var prop, condFmts, i;

    // Get a list of the conditions applied to the beginning of the text range.
    prop = doc.GetTextPropVal (textRange.beg, Constants.FP_InCond);
    condFmts = prop.propVal.osval;
    if (condFmts.length === 0) {
        return; // No conditions are applied to the text range; exit the function.
    }

    // Loop through the condition format names that are applied to the text.
    for (i = 0; i < condFmts.length; i += 1) {
        // See if the format is in the remove list.
        if (removeConditions.indexOf (condFmts[i].Name) > -1) {
            // Remove it from the list.
            Array.prototype.splice.call (condFmts, i, 1);
        }
    }

    if (condFmts.length !== prop.propVal.osval.length) {
        // Conditions were removed; apply the updated list back to the text range.
        prop.propVal.osval = condFmts;
        doc.SetTextPropVal (textRange, prop);
    }
}
In a future post, we will show how to loop through the text in a paragraph and isolate ranges of text that have distinct sets of conditions applied to them. These will get passed to our new removeConditionsFromText function to remove the specified conditions from paragraphs in a document. We will also develop a function that will remove conditions from table rows.